
Main project by Mayfly: https://github.com/Orange-Cyberdefense/GOAD
This was fully tested only on a Windows 10 machine with 64GB of RAM.
This may also work for GOAD-light and NHA.
It’s supposed to be the easiest guide on the internet for using and appreciating GOAD.
Hope it works for you.
PREREQUISITES
• Windows 10 (HOST)
• VMWARE Workstation (Also may work with Virtualbox, just adapt)
• Vagrant (Windows)
• Kali or Ubuntu (Choose any distro you want)
• A lot of disk space (~120GB)
• A lot of ram (At least 32GB for the main GOAD)
STEPS
Install VMware Workstation
https://www.vmware.com/products/workstation-pro/workstation-pro-evaluation.html
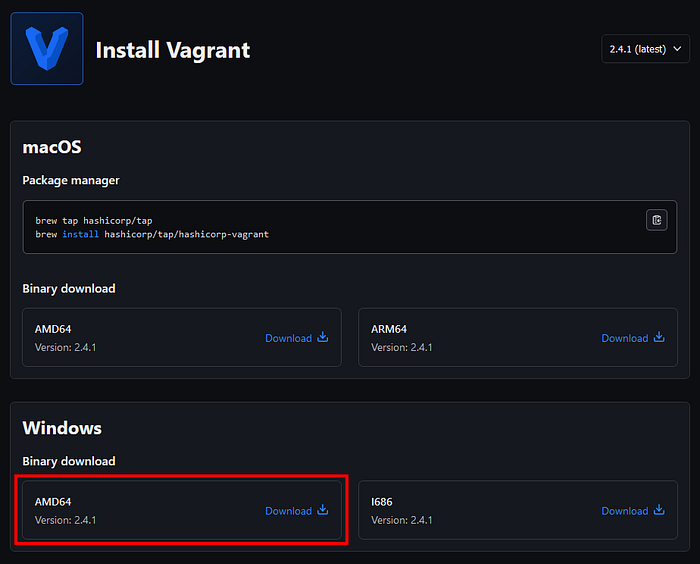
Install Vagrant for Windows
https://developer.hashicorp.com/vagrant/install?product_intent=vagrant#Windows
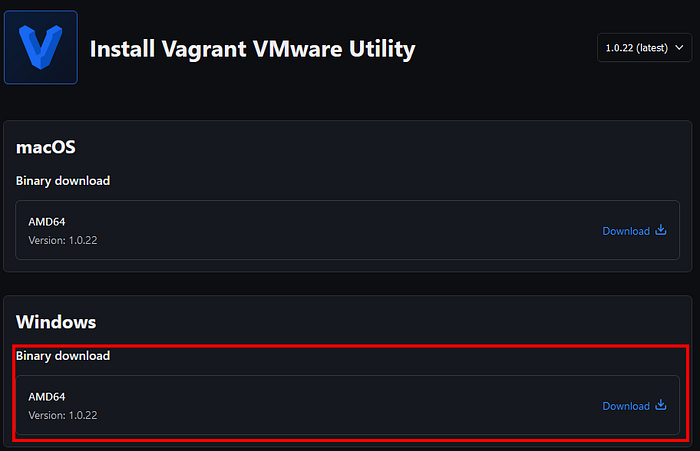
Install Vagrant VMware Utility
https://developer.hashicorp.com/vagrant/install/vmware
In the same folder your vagrant.exe is (default C:\Program Files\Vagrant\bin\), open a new cmd and type:
vagrant plugin install vagrant-vmware-desktop

Clone GOAD to a folder of your liking (recommend being the biggest hard drive you have and not C:) or just Download the zip in their github https://github.com/Orange-Cyberdefense/GOAD
Go to providers folder (cd GOAD/ad/GOAD/providers/vmware) and type
vagrant up
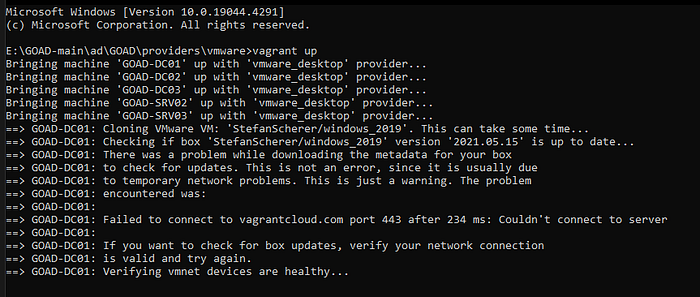
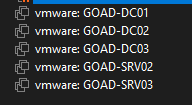
This will download and setup all the 5 machines necessary to your vmware. All 5 machines should start and appear on your vmware library.
If the error below appears, try disabling any virtualbox network adaptors you have. This will conflict with GOAD.

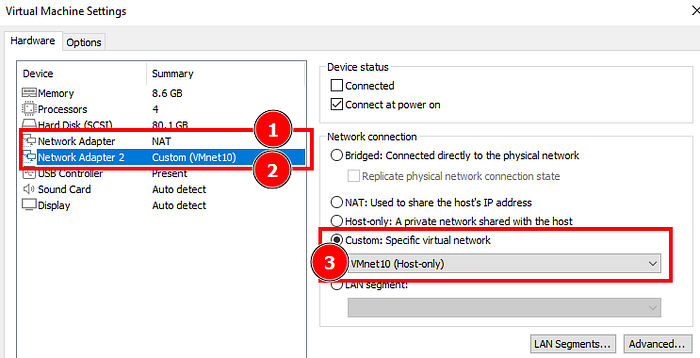
To able to communicate with the other machines, you gotta add a new NIC to your vmware and add it to your Kali (or distro of your choice).
Go to VMWare Workstation’s Virtual Network Editor
Add a new NIC adapter to 192.168.56.0 (Host-only) then add to you Kali/Ubuntu and keep your NAT otherwise you won’t have internet.

Now, inside the distro of your choice (I’m using Kali here), fire up your terminal and install some dependencies that are needed for Ansible etc.
pip install --upgrade pip
pip install ansible-core==2.12.6
pip install pywinrm

sudo apt install sshpass lftp rsync openssh-client
Clone the GOAD repo again in your Kali
Install ansible-galaxy:
sudo apt install ansible-core
Then go to your ansible folder (cd GOAD/ansible) and install the requirements needed:
ansible-galaxy install -r requirements.yml
Go back to the root folder of GOAD and run the local installation
./goad.sh -t install -l GOAD -p vmware -m local -a
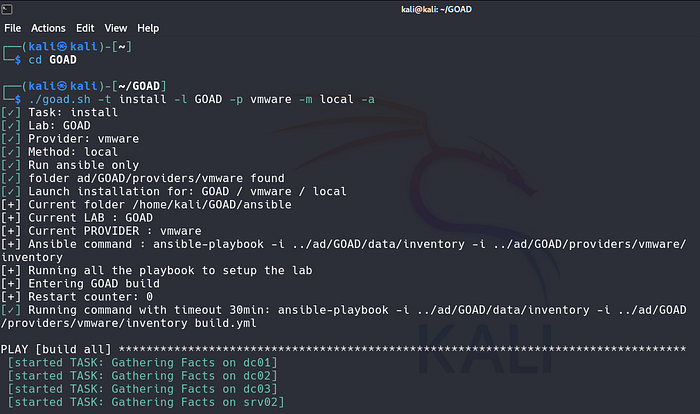
This is gonna take a while… grab a coffee ☕ or go watch something.
When this message appear, it all went well and now you can test it.

To test the connection, you can use netexec as following
nxc smb 192.168.56.0/24

Congratulations! You’ve now setup GOAD perfectly!
TROUBLESHOOTING TIPS
If some step on Ansible fails, you can simply destroy the vm you want (i.e: GOAD-DC01) and install again with Vagrant.
vagrant destroy GOAD-DC01

After that, just run vagrant up to download the machine then the local installation step again.
If you want to stop all machines, use vagrant halt.
BONUS: ELK
- Comment all boxes and uncomment ELK on Vagrantfile — location:
\ad\GOAD\providers\vmware\Vagrantfile
   Vagrant.configure("2") do |config|

ENV['VAGRANT_DEFAULT_PROVIDER'] = 'vmware_desktop'

boxes = [
  # windows server 2022 : don't work for now
  #{ :name => "DC01",  :ip => "192.168.56.10", :box => "StefanScherer/windows_2022", :box_version => "2021.08.23", :os => "windows"},
  # windows server 2019
 # { :name => "GOAD-DC01",  :ip => "192.168.56.10", :box => "StefanScherer/windows_2019", :box_version => "2021.05.15", :os => "windows"},
  # windows server 2019
  #{ :name => "GOAD-DC02",  :ip => "192.168.56.11", :box => "StefanScherer/windows_2019", :box_version => "2021.05.15", :os => "windows"},
  # windows server 2016
  #{ :name => "GOAD-DC03",  :ip => "192.168.56.12", :box => "StefanScherer/windows_2016", :box_version => "2017.12.14", :os => "windows"},
  # windows server 2019
  #{ :name => "SRV01", :ip => "192.168.56.21", :box => "StefanScherer/windows_2019", :box_version => "2020.07.17", :os => "windows"},
  # windows server 2019
 # { :name => "GOAD-SRV02", :ip => "192.168.56.22", :box => "StefanScherer/windows_2019", :box_version => "2020.07.17", :os => "windows"},
  # windows server 2016
  #{ :name => "GOAD-SRV03", :ip => "192.168.56.23", :box => "StefanScherer/windows_2016", :box_version => "2019.02.14", :os => "windows"}

  # ELK
 { :name => "GOAD-ELK", :ip => "192.168.56.50", :box => "bento/ubuntu-18.04", :os => "linux",
  :forwarded_port => [
    {:guest => 22, :host => 2210, :id => "ssh"}
  ]
}
]

  config.vm.provider "virtualbox" do |v|
    v.memory = 4000
    v.cpus = 2
  end

  config.vm.provider "vmware_desktop" do |v|
    v.vmx["memsize"] = "4000"
    v.vmx["numvcpus"] = "2"
    # v.force_vmware_license = "workstation"  # force the licence for fix some vagrant plugin issue
  end

  # disable rdp forwarded port inherited from StefanScherer box
  config.vm.network :forwarded_port, guest: 3389, host: 3389, id: "rdp", auto_correct: true, disabled: true

  # no autoupdate if vagrant-vbguest is installed
  if Vagrant.has_plugin?("vagrant-vbguest") then
    config.vbguest.auto_update = false
  end

  config.vm.boot_timeout = 600
  config.vm.graceful_halt_timeout = 600
  config.winrm.retry_limit = 30
  config.winrm.retry_delay = 10

  boxes.each do |box|
    config.vm.define box[:name] do |target|
      # BOX
      target.vm.provider "virtualbox" do |v|
        v.name = box[:name]
        v.customize ["modifyvm", :id, "--groups", "/GOAD"]
      end
      target.vm.box_download_insecure = box[:box]
      target.vm.box = box[:box]
      if box.has_key?(:box_version)
        target.vm.box_version = box[:box_version]
      end

      # issues/49
      target.vm.synced_folder '.', '/vagrant', disabled: true

      # IP
      target.vm.network :private_network, ip: box[:ip]

      # OS specific
      if box[:os] == "windows"
        target.vm.guest = :windows
        target.vm.communicator = "winrm"
        target.vm.provision :shell, :path => "../../../../vagrant/Install-WMF3Hotfix.ps1", privileged: false
        target.vm.provision :shell, :path => "../../../../vagrant/ConfigureRemotingForAnsible.ps1", privileged: false

        # fix ip for vmware
        if ENV['VAGRANT_DEFAULT_PROVIDER'] == "vmware_desktop"
          target.vm.provision :shell, :path => "../../../../vagrant/fix_ip.ps1", privileged: false, args: box[:ip]
        end

      else
        target.vm.communicator = "ssh"
      end

      if box.has_key?(:forwarded_port)
        # forwarded port explicit
        box[:forwarded_port] do |forwarded_port|
          target.vm.network :forwarded_port, guest: forwarded_port[:guest], host: forwarded_port[:host], host_ip: "127.0.0.1", id: forwarded_port[:id]
        end
      end

    end
  end
end
2. vagrant up to install ELK. When it finishes, revert to the original file again:
Vagrant.configure("2") do |config|

ENV['VAGRANT_DEFAULT_PROVIDER'] = 'vmware_desktop'

boxes = [
  # windows server 2022 : don't work for now
  #{ :name => "DC01",  :ip => "192.168.56.10", :box => "StefanScherer/windows_2022", :box_version => "2021.08.23", :os => "windows"},
  # windows server 2019
  { :name => "GOAD-DC01",  :ip => "192.168.56.10", :box => "StefanScherer/windows_2019", :box_version => "2021.05.15", :os => "windows"},
  # windows server 2019
  { :name => "GOAD-DC02",  :ip => "192.168.56.11", :box => "StefanScherer/windows_2019", :box_version => "2021.05.15", :os => "windows"},
  # windows server 2016
  { :name => "GOAD-DC03",  :ip => "192.168.56.12", :box => "StefanScherer/windows_2016", :box_version => "2017.12.14", :os => "windows"},
  # windows server 2019
  #{ :name => "SRV01", :ip => "192.168.56.21", :box => "StefanScherer/windows_2019", :box_version => "2020.07.17", :os => "windows"},
  # windows server 2019
  { :name => "GOAD-SRV02", :ip => "192.168.56.22", :box => "StefanScherer/windows_2019", :box_version => "2020.07.17", :os => "windows"},
  # windows server 2016
  { :name => "GOAD-SRV03", :ip => "192.168.56.23", :box => "StefanScherer/windows_2016", :box_version => "2019.02.14", :os => "windows"}

  # ELK
# { :name => "GOAD-ELK", :ip => "192.168.56.50", :box => "bento/ubuntu-18.04", :os => "linux",
#   :forwarded_port => [
#     {:guest => 22, :host => 2210, :id => "ssh"}
#   ]
# }
]

  config.vm.provider "virtualbox" do |v|
    v.memory = 4000
    v.cpus = 2
  end

  config.vm.provider "vmware_desktop" do |v|
    v.vmx["memsize"] = "4000"
    v.vmx["numvcpus"] = "2"
    # v.force_vmware_license = "workstation"  # force the licence for fix some vagrant plugin issue
  end

  # disable rdp forwarded port inherited from StefanScherer box
  config.vm.network :forwarded_port, guest: 3389, host: 3389, id: "rdp", auto_correct: true, disabled: true

  # no autoupdate if vagrant-vbguest is installed
  if Vagrant.has_plugin?("vagrant-vbguest") then
    config.vbguest.auto_update = false
  end

  config.vm.boot_timeout = 600
  config.vm.graceful_halt_timeout = 600
  config.winrm.retry_limit = 30
  config.winrm.retry_delay = 10

  boxes.each do |box|
    config.vm.define box[:name] do |target|
      # BOX
      target.vm.provider "virtualbox" do |v|
        v.name = box[:name]
        v.customize ["modifyvm", :id, "--groups", "/GOAD"]
      end
      target.vm.box_download_insecure = box[:box]
      target.vm.box = box[:box]
      if box.has_key?(:box_version)
        target.vm.box_version = box[:box_version]
      end

      # issues/49
      target.vm.synced_folder '.', '/vagrant', disabled: true

      # IP
      target.vm.network :private_network, ip: box[:ip]

      # OS specific
      if box[:os] == "windows"
        target.vm.guest = :windows
        target.vm.communicator = "winrm"
        target.vm.provision :shell, :path => "../../../../vagrant/Install-WMF3Hotfix.ps1", privileged: false
        target.vm.provision :shell, :path => "../../../../vagrant/ConfigureRemotingForAnsible.ps1", privileged: false

        # fix ip for vmware
        if ENV['VAGRANT_DEFAULT_PROVIDER'] == "vmware_desktop"
          target.vm.provision :shell, :path => "../../../../vagrant/fix_ip.ps1", privileged: false, args: box[:ip]
        end

      else
        target.vm.communicator = "ssh"
      end

      if box.has_key?(:forwarded_port)
        # forwarded port explicit
        box[:forwarded_port] do |forwarded_port|
          target.vm.network :forwarded_port, guest: forwarded_port[:guest], host: forwarded_port[:host], host_ip: "127.0.0.1", id: forwarded_port[:id]
        end
      end

    end
  end
end
3. Go to your Kali > GOAD folder and edit goad.sh and add elk.yml to ANSIBLE_PLAYBOOKS
ANSIBLE_PLAYBOOKS="build.yml ad-servers.yml ad-parent_domain.yml ad-child_domain.yml ad-members.yml ad-trusts.yml ad-data.yml ad-gmsa.yml laps.yml ad-relations.yml adcs.yml ad-acl.yml servers.yml security.yml vulnerabilities.yml reboot.yml elk.yml"
4. Run the install again with the following
./goad.sh -t install -l GOAD -p vmware -m local -a -r elk.yml
5. Do vagrant up again
6. Access your ELK at http://192.168.56.50:5601/
Have fun!