Overview
I want to provide some perspective on a couple subjects in this article that I’ve had trouble understanding or that I frequently go to my notes to clarify.
The subjects I shall cover in this post are listed below:
- User mode versus kernel mode
- Processes & Threads
- Handles and Objects
- Virtual Memory
- Function Call Flow
While each of these subjects may be the subject of a separate blog article, this one is designed to serve as an introduction. In the future, I could write pieces that are a little bit more in-depth.
I’m going to guide you through the steps involved in carrying out typical tasks on a Windows operating system. This tutorial will show you what’s going on “under the hood” of Windows.
Let’s jump right into it!
1. User Mode versus Kernel Mode
To start, Windows divides the processor into two access modes in order to prevent user applications from accessing crucial operating system data. User mode and Kernel Mode are these two modes.
This schema makes sure that any user application executing undesired activities won’t affect the overall system’s stability or availability.

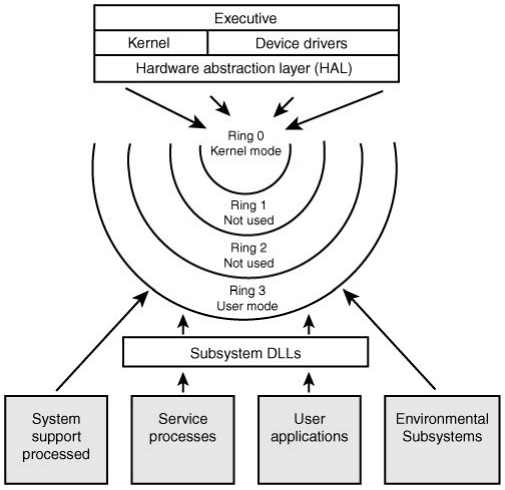
There are a total of seven levels (or rings) of defense in the figure above. Code will always have a mode attached to it when it runs. The “Thread Access Mode” or “Current Privilege Level (CPL)” is what this is also known as.
There may be multiple rings, but Windows only makes use of two of them:
- Ring 0 (Kernel Mode); which is the most privileged
- Ring 3 (User Mode); which is the least privileged
Key distinctions between Kernel Mode and User Mode are listed below:
- (CPL 3) User Mode
- Hardware cannot be accessed directly
- Unable to access certain virtual memory regions
- Calls system calls in order to carry out various activities.
- Has a limited audience
- (CPL 0) Kernel Mode
- Has direct hardware access
- Able to access all areas of virtual memory
- Doesn’t need to make System Calls, but is capable of doing so
- Access is unrestricted.
1.1 User Mode
Code execution in user programs is handled by user mode. This mode forbids access to system hardware as well as operating system code and data. Only the application where the issue occurred is affected if a crash happens in this mode.

1.2 Kernel Mode
It has full access to the kernel and device drivers in this mode. Furthermore, this mode has access to all system resources. The famed Blue Screen of Death (BSoD) is a system crash that can be caused by any unhandled exception in kernel mode.

You will be able to read and write data in the segments of that CPL (and of that of the lesser) depending on the CPL you are working in. A “Call Gate” must be invoked in order to go from User Mode (CPL 3) to Kernel Mode (CPL 0). Later in the post, I’ll shed more light on what call gates are.
Viewing the ‘Performance‘ tab in Task Manager gives us a little bit of a picture. For details, see the image below.
As seen in the visual, we can see when the CPU is performing operations in User Mode vs Kernel Mode. You’re able to see this graph layout, by right-clicking in the graph and selecting 'Show kernel times'.

2. Processes and Threads
2.1 Processes

Threads run code in management containers called processes. First off, it’s erroneously believed that a “process is running.” Since a process is never “running,” this is untrue. Simply said, a process serves as a manager or container for the resources used to carry out calls. It is threads, not processes, that are truly “running” or carrying out code.
According to the illustration above, a process includes the following:
- An exclusive virtual address space
- A software that can be run and contains executable data.
- A listing of handles for kernel objects
- A symbol of admission; used when accessing shared resources for security checks.
- Control one or more threads; the thing that executes code.
We can view the list of current processes in ‘Task Manager’ or ‘Process Explorer’, as seen in the figures below.


Process Creation
Now that we have a general understanding of what a process is, let’s look at what occurs when a process is created (using CreateProcess()). Prior to a process being allowed to carry out its activity, a number of conditions must be met. Beyond simply running the application’s executable, much more occurs in the background. Let’s look more closely.
The process starts with opening the executable, as was previously explained. Along with other elements (such mapping and the proper headers, etc.), the executable is in charge of storing the primary functionality of the application.
What else is going on then? The kernel must control this process in addition to initializing its construction. A few data structures are used for this. In a minute, we’ll look at these data structures.
The first thread is formed after that. A thread must constantly be connected to a process for the process to have any real use. The kernel must control the threads that are part of the process once the initial thread is created. Additionally, a few data structures that we’ll discuss later are used to do this.
Next, the Client Server Runtime SubSystem (CSRSS.exe) has been informed that the process and first thread have been established and are now being managed. User mode processes are managed by the Win32 subsystem process known as Client Server Runtime SubSystem (CSRSS.exe). The final step in creating a process is loading and initializing the necessary DLLs (i.e., header files specified inside a Visual Studio program), as well as loading the primary functions of each DLL.
Following is a summary of process creation:
- The executable file is launched.
- Executive Process (EPROCESS/KPROCESS) object generation in kernel
- Establishing the first thread of the new process
- The new process and thread are informed of via the Executive Thread (ETHREAD/KTHREAD) object in the kernel
- CSRSS.exe is notified of the new process and thread.
- Completing the start-up of the new thread and process
- Bringing up the necessary DLLs
- Calling the primary operations
Now, let’s take a look at the data structures that were mentioned above, and provide some visual context. To get started, we’ll need to fire up LiveKD (Click for download) from the Windows SysInternals Suite and WinDbg from Debugging Tools for Windows – Windows drivers | Microsoft Learn.
Let’s make sure your environment is set up properly if you’re following along. We must install LiveKD in the same directory as WinDbg after downloading it. We may continue by establishing an administrative command prompt in the directory containing both modules after installing LiveKD in the proper directory that also contains WinDbg.

Let’s use the !process 0 0 command after the debugger has been launched and is operational. The information about all the processes that are active on the system will be printed out by this command.

These are addresses to each process EPROCESS structure, which is controlled by the ‘Executive’ component in the Windows architecture and is highlighted in the above image. Keep reading; we’ll soon discuss Windows’ overall design.
We may use the command !process <EPROCESS_Addr> to learn more about a certain process that is presently active. (For an illustration, see the picture below.)
Keeping with the theme, I’ve requested further details on the ‘Notepad.exe’ process.

From the output, we can see quite a lot of information about the ‘Notepad.exe’ process. We can see the process identifier (the 'CID' parameter in the output), the 'Token' address (which discloses the security context of the process), etc. Due to there being so much presented in the output, I won’t be going into much further details here. However, I do want to show how you can enumerate all this information by crawling the EPROCESS structure through offsets. To make sure we’re working under the context of ‘Notepad.exe’ in the debugger, we’re going to issue .process <Notepad_EPROCESS_Addr>. This will switch the active process that WinDbg is working under to the specified process.
We’ll know if we’ve successfully transitioned, if we receive a message in WinDbg stating: Implicit process is now <EPROCESS_Addr>.

Now that WinDbg is working under the ‘Notepad.exe’ process, let’s dump the 'EPROCESS' table with the dt NT!_EPROCESS.

As we can see here, we’ve dumped the table of the EPROCESS structure, and can now identify the offsets of where specific data is placed. Let’s take the UniqueProcessId offset at +0x440 and see if it matches up with the process identifier for ‘Notepad.exe’ in ‘Task Manager’ (or ‘Process Explorer’).
Now would you look at that! By taking the sum of the base address of EPROCESS and the offset to reach UniqueProcessId.
Using dq <EPROCESS_Addr> + <UniqueProcessId>

We successfully verified that it’s a match! (Remember your hexadecimal to decimal conversions!)


The same steps can be taken to gain some insight on other important data structures; such as KPROCESS, ETHREAD, KTHREAD, etc.
To encapsulate each of these data structures, refer to the information below.
EPROCESSstructure is the kernel’s representation of a process object.KPROCESSstructure is the Kernel’s portion of the EPROCESS structure.ETHREADstructure is the kernel’s representation of a thread object.KTHREADstructure is the Kernel’s portion of the ETHREAD structure.
Here’s a high-level graph overviewing these structures and how they all mesh together.

2.2 Threads
As was already explained, threads are objects that the kernel has scheduled to run code.
A thread includes the following elements:
- Condition of CPU registers
- User or kernel access mode at the moment
- Kernel and User stacks
- Thread Local Storage (TLS), a secure data storage system
- Optional security token with the ability to run with a greater or lower degree of privileges via impersonating
- Windows that the thread produces are optional and might be running or not responding.
- A ranking (0 (Lowest) to 31 (Highest)
- A state: Running, Ready, Waiting
These are the people who control a window that accepts human input, such as Notepad. As a result, when you open Task Manager and see “Status – Running” or “Status – Not Responding”, they merely indicate whether a thread is prepared to take input or is engaged in an activity.
The “Status – Not Responding” message informs you that the thread has been stalled while attempting to execute an operation for five seconds or more.
Let’s look at two instances of Notepad.exe to provide a visual representation of threads. A first thread is established when a user launches a program, such as Notepad.exe.

In the first instance of Notepad, it will be waiting for the user to request some kind of operation to be performed. Since it’s not performing any kind of operation, there should only be one thread assoicated to this process.
Alternatively, in the second instance of Notepad, we’re going to perform an operation. For this example, let’s try and open a file in Notepad. Upon clicking into the File tab in Notepad, and clicking the Open File option, we’ll be able to see that additional threads are being created by the initial thread to carry out the request. See the screenshot below for details.

If you’d like to see each individual thread, the thread identifier (TID), etc., we can use ‘Process Explorer’.

Having gained some understanding of processes and threads, let’s go on to talking about objects and handles and how they function.
3. Objects and Handles
An object is a static data structure that resides in the system’s memory space and represents runtime resources like processes, threads, etc. An object also contains data about a variety of properties, such as the sort of object it is. The Object Manager oversees all objects. The task of generating, maintaining, and terminating objects falls under the purview of the Object Manager.
For a deeper understanding, let’s use ‘Process Explorer‘.

A direct pointer to an item can be obtained via kernel code. User mode code must utilize a handle in order to access an object. An index in a database that links to a particular item in kernel space is called a handle. They serve as barriers that prevent user programs from directly accessing kernel-level objects.
The following information is crucial to comprehend:
- All handle values are multiples of 4
- References to objects are kept.
- The reference counter management is under the purview of the object manager.
- Each process has an own Handle Table.
Once more, ‘Process Explorer’ may be used for a more visual representation.

4. Virtual Memory
Windows uses a linear memory model to implement virtual memory. Each process has a private virtual address space of its own. A process’s virtual address space is split into two sections: user space and kernel space.
To further explain, let’s refer to the diagram below.

Virtual memory may be mapped to physical memory, but can also be stored on disk (Page file) Processes access memory (via a pointer) regardless of where it resides
- The memory manager handles the mapping of virtual to physical pages
- Processes don’t know the actual physical address of a given virtual memory address
- Processes always use the virtual memory address Virtual Memory Mapping: RAM (Physical Memory) is shared by all processes When a process allocates memory, it is mapped to physcial memory (Blue blocks in diagram)
- These chunks of memory are known as pages
- Pages are 4kb in size
- Chunks of memory, or pages, don’t need to be contiguous in physical memory, even if they’re contiguous in virtual memory
- In some occasions, virtual memory may be mapped temporarily to disk, if the physical memory is being used up by other processes
- Sometimes, virtual memory from different processes can be mapped to the same physical page (meaning the page is shared)
- For example; two processes resourcing for ‘Notepad.exe’
- Windows will try and share resources as much as possible, if it makes sense to.
- For example; two processes resourcing for ‘Notepad.exe’
In task manager or process explorer, under the ‘Details’ tab, you can see the ‘Memory (Private Working Set)’ column.

- ‘Private’ meaning the memory is not shared
- Allocating memory via ‘malloc’ is considered private memory, this is what is shown
- Loading a DLL is sharable memory, and isn’t shown in this column but in the ‘Memory (Shared Working Set)’ column
- To get a better idea of how much memory a process consumes, view the ‘Commit Size’ column
- ‘Working Set’ is a term used to describe physical memory
- This column shows how much memory is being used by the process
- The values under this column are always divisible by 4 (The size of a memory page

4.1 Virtual Memory Layout
Let’s now speak a little bit about virtual memory, how it functions, and how 32-bit and 64-bit virtual memory spaces differ from one another.

As seen the in ‘Virtual Memory Layout’ illustration, shown above, 32-bit and 64-bit architecture have quite a huge gap between one another.
On a 32-bit architecture, we can see that it has a total of 4 GB of virtual memory.
The memory is split into User Process Space (Lower Addresses) and System Space (Higher Addresses).
- 2 GB for User Process Space
- 2 GB for System (Kernel) Space
On a 64-bit architecture, we can see that it utilizes a total of 14 TB of virtual memory (prior to Windows 8.1).
The memory is split into User Process Space (Lower Addresses) and System Space (Higher Addresses).
- 8 TB User Process Space
- 8 TB System (Kernel) Space
However, upon Windows 8.1 release, the virtual memory space expanded.
- 128 TB User Process Space
- 128 TB System (Kernel) Space
5. General Architecture of Windows
Let’s discuss the overall architecture of Windows now that we’ve discussed what processes, threads, objects and handles, and virtual memory are.

You can see quite a few parts that make up the overall architecture on which Windows is based in the above graphic.
As you can see, Windows is split into two sections based on the line separator:
- User Mode
- Kernel (Protected Mode)
There are many components connected to these two elements. To further understand what each component is, let’s dissect these components a little.
- User Applications -These are programs that desire to carry out operations on the operating system. An example of one of these programs is Notepad.exe’s CreateFile() function.
- Subsystem DLLs – In order to utilize the CreateFile() function specified in the ‘User Application’ component, you must use the appropriate subsystem DLL that CreateFile() is implemented in (in this case, Kernel32.DLL).
- NTDLL.DLL – Handles the shift from User Mode to Kernel Mode, the lowest layer in User Mode.
- Executive layer – When switching from User Mode to Kernel Mode, NTDLL.DLL often accesses Executive layer, which is the top layer in Kernel Mode.
- Kernel – The bottom layer in kernel mode known as the kernel is responsible for providing crucial OS features including thread scheduling, interrupt handling, and exception dispatching.
- Device drivers – which include file system and network drivers, are loadable kernel modules in charge of performing tasks for a particular device.
- Hardware Abstraction Layer (HAL) – A crucial part of Windows that serves as a barrier between the hardware and software.
- Graphics (Win32k) – This is used to handle all window related requests; such as resizing/minimzing a windows screen,etc. (UI related)
- For this, instead of being directed to the ‘Executive’ component, your request will be sent here.
- Environment subsystem – This component is a process that manages other subsystems (i.e. Win32 (CSRSS.EXE))
- Services – This component manages processes running in User Mode (i.e. A Web Server listening for HTTP requests on TCP Port 80)
- System Processes – This component manages important processes that are usually always running, and killing/crashing one of these processes can be fatal to the system (i.e. CSRSS.EXE, Services, SMSS.EXE)
After providing a very high-level summary of each of the components, let me try to make this information more visually appealing.
5.1 CreateFile() Function Call Flow
How do we go from User Mode to Kernel Mode then? How does it seem on the inside? When threads in user mode are conducting actions (like CreateFile()), user mode may switch to kernel mode.
Let’s take a closer look at this method by going through the elements mentioned in the previous section. The following graphic will be used to offer some visualization.

CreateFile() Function Call FlowThe procedure that takes place when we call an operation, such CreateFile(), is as follows: Consider a user application that needs to create a new file, such as Notepad.exe.
- The application process first invokes
CreateFile()through a thread. - Since
CreateFileW()is in the Kernel32.DLL subsystem and Kernel32 does not have direct access to theCreateFile()object (since it is in kernel mode), it uses NTDLL.DLL- NTDLL to validate the
CreateFile() arguments.DLLserves as a bridge between User Mode and Kernel Mode and is the lowest layer in User Mode.
- NTDLL to validate the
- As previously indicated, NTDLL.The thread seeking service from the
CreateFile()NTDLL is handled by the DLL during the change from User Mode to Kernel Mode.- ‘
NtCreateFile()‘ is the native api call that the DLL uses forCreateFile(). - The sysenter/syscall (x86/x64) call to switch from User Mode to Kernel Mode may be seen at this stage.
- ‘
Let’s look at these initial WinDbg instructions to help things make a bit more sense. We’ll launch Notepad.exe using the ‘launch an Executable’ option under the ‘File’ tab in order to debug a program in WinDbg.

As soon as WinDbg is connected to Notepad, a breakpoint is instantly shown. From here, we can use the command ~ to view the active threads and their related processes for Notepad.exe in order to illustrate some of the other things we’ve discussed thus far.

~ to view the active threadsThe process identifier for Notepad.exe (Using Task Manager):

The thread identifier for Notepad.exe (Using Process Explorer):

Let’s proceed by setting a breakpoint on CreateFileW() in WinDbg. We can set this breakpoint with bp Kernel32!CreateFileW (or bp KernelBase!CreateFileW)
- KernelBase and Kernel32 go hand-in-hand
- KernelBase recently came about in newer versions of Windows to improve efficiency and reduce surface area (Disk and memory requirements, etc.)
- For more information on this, see ‘New Low-Level Binaries’ written by Microsoft.
- KernelBase recently came about in newer versions of Windows to improve efficiency and reduce surface area (Disk and memory requirements, etc.)
- We use
CreateFileW()overCreateFileA()orCreateFile()here because:CreateFile()is not the actual function name (WinDbg will yell at you, if you try using it)CreateFileA()is not used by Notepad (Notepad uses unicode functions by default)
After setting a breakpoint, we need to invoke an action within Notepad.exe that’ll call the CreateFileW() function (In this case, we’ll try saving a new text document) Upon saving the new file, we hit our breakpoint and can dump the callstack using K command to see what occured leading up to the CreateFileW() function.

You will need to press F5 to continue running the application until the app opens then saving new file that will hits in the breakpoint and the debug will stop.
From this point, we’ve seen what happens between the ‘User Application – Notepad’ and the ‘Subsystem DLL – Kernel32.DLL’. Now let’s see what happens between ‘Subsystem DLL – Kernel32.DLL’ and ‘NTDLL.DLL’.
Let’s set a breakpoint on NtCreateFile with the bp NTDLL!NtCreateFile.
After successfully setting the breakpoint, and allowing execution to continue, we’ll hit the breakpoint on NtCreateFile(). If we dump the callstack with k, we can get a little more details on what happened leading up to NtCreateFile().

NtCreateFile()Let’s see a little more detail on what’s going on in the NtCreateFile() function by using the unassemble command u and see what instructions are going to be executed.

Notice in the screen capture above the mov eax, 55h instruction. This instruction discloses the System Service Number (SSN) for the NtCreateFile() function. A System Service Number (SSN) is a number in an array managed by the System Service Descriptor Table (SSDT).
If we keep tracing through the instructions, we’ll see that we eventually hit the syscall instruction.

Now, if we were to carry out this function, we would observe that Kernel Mode shows no signs of activity. We won’t be able to examine anything occurring in Kernel Mode because we are troubleshooting the program itself.
The part after this will investigate what’s happening in kernel mode.
5.2 Kernel Mode Function Call Flow
Now that we’ve seen what goes on in User Mode leading up to the transition from User Mode to Kernel Mode, let’s go through what happens in Kernel Mode.
- After NTDLL.DLL transitions the thread’s service request from User Mode to Kernel Mode, we reach the upper layer of Kernel Mode, known as ‘Executive’
- This layer is reached by calling a function within an NTDLL function
- The ‘Executive’ consists of many components; such as the Memory and IO Managers, etc.
- This layer also performs some security checks, but does nothing in terms of implementation of the thread service request
- The handle is checked here, in order to call the appropriate driver, to continue with the service request
- The ‘Executive’ layer take the NtCreateFile() request received and passes it along to a lower level in Kernel Mode
- It can be passed to one of two components: ‘Device Drivers’ or the ‘Kernel’
- Kernel: Provides important OS facilities (Thread Scheduling, Handling Interrupts, etc.)
- Device Drivers: A loadable kernel module (something that can be created by developers)
- In this example, the ‘Executive’ layer will pass the service request to the ‘Device Driver’ component
- This is because CreateFile() function, since Windows utilizes the NTFS file system model, by default (NTFS.SYS)
- It can be passed to one of two components: ‘Device Drivers’ or the ‘Kernel’
- Once the service request is received by NTFS.SYS, the service request operation will commence
- The device driver may need to go through the HAL
- The HAL insolates the hardware from the software
- An example is if a driver needs to register for an interrupt service, it doesn’t need to get into the actual hardware (Interrupt Controller)
- Instead the driver can go through the exposed functions provided by the HAL (but this isn’t mandatory)
- The HAL insolates the hardware from the software
- The device driver may need to go through the HAL
For this, we’ll once again be using ‘LiveKD’. Again, the command for this is LiveKD.exe -w.
Now that we’re successfully debugging the live system, let’s pick-up where we left off in the previous section. We’ve just identified the System Service Number (SSN) for NTDLL!NtCreateFile, and made it up to the syscall instruction. Let’s look a little deeper into that System Service Number (SSN); which was fingerprinted as 55h in the mov eax, 55h instruction. As mentioned before, the System Service Descriptor Table (SSDT) manages an array of addresses to kernel routines. These routines are index pointers to the NT system API calls; such as NT!NtCreateFile. Let’s see if we can verify that the NTDLL!CreateFile System Service Number (SSN) is actually correct!
We can validate this by using WinDbg to analyze the System Service Descriptor Table (SSDT). In WinDbg, we can see the Service Descriptor Table structure by using the x nt!KiService* command. This will provide us the information to the pointer of the SSDT itself NT!KiServiceTable. From here, we can dump the SSDT with the dq NT!KiServiceTable command. This command output will provide us with the relative offset to the kernel routines, at least on 64-bit architecture.
SSDTs used to be hooked by AVs as well as rootkits that wanted to hide files, registry keys, network connections, etc. Microsoft introduced PatchGuard for x64 systems to fight SSDT modifications by BSOD’ing the system.

Using Nt!KiServiceTable and the SSN we identified earlier, we can calculate the relative offset to the kernel routine for NT!NtCreateFile.
Now that we have the relative offset, we can use that in the following formula to calculate the absolute address for NT!NtCreateFile:
- Finding
routineOffset–>dd /c1 KiServiceTableAddress +<SSN> L1 - Finding absolute address of a kernel routine –>
u KiServiceTable + (routineOffset >>> 4) L1

As we can see, we successfully identified that the SSN for NTDLL!NtCreateFile correctly points to NT!NtCreateFile
If we wanted to, we could compute all of the SSDT procedures using the same algorithm. In the screenshot below, we can observe this in action.

The command I used:
.foreach /ps 1 /pS 1 ( offset {dd /c 1 nt!KiServiceTable L poi(nt!KeServiceDescriptorTable+10)}){ r $t0 = ( offset >>> 4) + nt!KiServiceTable; .printf "%p - %y\n", $t0, $t0 }
References
- Windows Internals by Pavel Yosifovich, Alex Ionescu, Mark E. Russinovich, and David A. Solomon